FortiGate IPsec 2025年10月11日
FortiGateでのIPsecダイヤルアップ接続の基本設定
はじめに
- 本記事では、本社(固定グローバルIP)に、動的IPの支社が複数ぶら下がる構成を、FortiGateのIPsecダイヤルアップ機能で実装します。
いわゆる“リモートアクセスVPN”ではなく、拠点間VPN(Site-to-Site)をダイヤルアップで受けるパターンです。
なぜダイヤルアップ接続なのか
- 拠点側のグローバルIPが動的でも、本社側が発着信を受けられればIPsec構成をとることが可能。
- 拠点が増えても拠点側の設定だけで完結でき、拠点が増えても本社側の設定が不要であるため、スケールアウトしやすい。
トポロジ
- 本社:203.0.113.1 / LAN 192.168.1.0/24
- 支社A:198.51.100.1 / LAN 10.10.10.0/24
- 支社B:198.51.100.2 / LAN 10.10.20.0/24
- 図中の 172.16.0.x/24 は「IPsec上のセグメント」
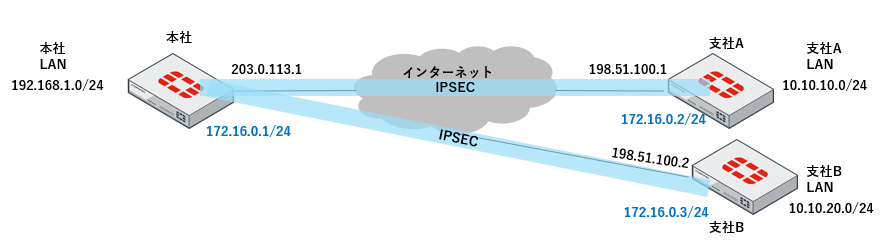
ダイヤルアップで支社×2を収容
設計のキモ(固定ピアとの違い)
- 本社Phase1は**set type dynamic + set peertype any**
- 本社は拠点LAN宛の静的ルートを、それぞれのIPsec IFに向ける
- **set add-route disable**で自動ルート注入を止め、静的ルートで統一管理
本社設定
### Phase1の設定 ###
config vpn ipsec phase1-interface
    edit "VPN-P1"
        set type dynamic
        set interface "wan1"
        set ike-version 2
        set peertype any
        set net-device disable
        set proposal aes256-sha256
        set add-route disable
        set dpd on-idle
        set dhgrp 19
        set psksecret ***
    next
end

#### Phase2の設定 ###
config vpn ipsec phase2-interface
    edit "VPN-P2"
        set phase1name "VPN-P1"
        set proposal aes256-sha256
        set dhgrp 19
        set pfs enable
    next
end

### トンネルインターフェイスの設定 ###
config system interface
    edit "VPN-P1"
        set vdom "root"
        set ip 172.16.0.1 255.255.255.255       # 自側アドレス (/32)
        set allowaccess ping                    # ping許可
        set type tunnel
        set remote-ip 172.16.0.254 255.255.255.0  # 利用予定の無い宛先を指定
        set interface "wan1"
    next
end

### ルーティング ###
config router static
    edit 0
        set dst 10.10.10.0 255.255.255.0   # 支社A向け
        set device "VPN-P1"
    next
    edit 0
        set dst 10.10.20.0 255.255.255.0   # 支社B向け
        set device "VPN-P1"
    next
end

### Firewall Policy ###
config firewall policy
    edit 0
        set name "BRANCH-to-HQ"
        set srcintf "VPN-P1"
        set dstintf "lan"
        set srcaddr "all"
        set dstaddr "all"
        set action accept
        set schedule "always"
        set service "ALL"
    next
    edit 0
        set name "HQ-to-BRANCH"
        set srcintf "lan"
        set dstintf "VPN-P1"
        set srcaddr "all"
        set dstaddr "all"
        set action accept
        set schedule "always"
        set service "ALL"
    next
end
- 本社側はDialup接続で待ち受けるため、Initiatorとはならない。そのため、auto-negotiateの設定は不要。
config vpn ipsec phase1-interface | FortiGate / FortiOS 7.6.4 | Fortinet Document Library
支社設定
### Phase1の設定 ###
config vpn ipsec phase1-interface
    edit "VPN-P1"
        set interface "wan1"
        set ike-version 2
        set peertype any
        set net-device enable
        set proposal aes256-sha256
        set add-route disable
        set dhgrp 19
        set remote-gw 203.0.113.1
        set dpd on-idle
        set psksecret ***
    next
end

### Phase2の設定 ###
config vpn ipsec phase2-interface
    edit "VPN-P2"
        set phase1name "VPN-P1"
        set proposal aes256-sha256
        set dhgrp 19
        set pfs enable
    next
end

### ルーティング ###
config router static
    edit 0
        set dst 192.168.1.0 255.255.255.0
        set device "VPN-P1"
    next
end

### Firewall Policy ###
    edit 1
        set name "BRANCH-to-HQ"
        set srcintf "lan"
        set dstintf "VPN-P1"
        set srcaddr "all"
        set dstaddr "all"
        set action accept
        set schedule "always"
        set service "ALL"
    next
    edit 2
        set name "HQ-to-BRANCH"
        set srcintf "VPN-P1"
        set dstintf "lan"
        set srcaddr "all"
        set dstaddr "all"
        set action accept
        set schedule "always"
        set service "ALL"
    next
end
- 支社側の設定は本社と接続するため共通の設定となる。IPsecを張るときは常に支社から本社向けにネゴシエーションを開始する。
- 支社Aと支社Bを通信させる場合は、支社Aと支社Bで直接1対1のIPsecを張る方法もあるが、台数が増えるとフルメッシュ接続が必要となるため、本社がHUBとなり、本社で折り返して支社間で通信させるのが一般的。
- 本社折り返しで支社Aと支社Bを通信させるには、上記の支社側のルーティングの設定に、VPNインターフェイス経由で支社宛てのセグメントを本社宛てに送付するように設定を追加する。
まとめ
- 本社は“ダイヤルアップ(set type dynamic)で待ち受け、IPsec接続時は常に支社から本社へ。
- 本社折り返しの支社間通信は、支社側の静的ルートに「相手支社LAN → VPNインターフェイス」を追加して実現(フルメッシュ不要)。
スケール時のおすすめ(任意)
- 支社Aと支社Bを本社経由で通信すると、本社の立地によっては遠回りの通信となり、遅延が生じる可能性がある。また、拠点が増えると本社に通信が集中するため本社の負荷が高くなる。一方で本社を経由させず、支社間で通信させようとすると、それぞれVPNトンネルの設定を追加していく必要があるが、これを動的に設定する、ADVPNという機能もあるのでこちらを検討する。
FortiGateでの1対1 IPsec VPN 基本設定とベストプラクティス - ゆるっとFortiGate解説 fortigate.hatenablog.jp